GRAPHIC DESIGNER
What does the person in the career do?
A graphic designer or graphic artist is a person who conveys information through visual solutions which promote or enhance a service, product, philosophy or entity. They have quite a fascinating job as they help communicate ideas visually as words alone cannot do everything.
For example : A pie chart is able to communicate information like data much better than a 300 word paragraph and it is the job of a Graphic Designer to communicate such ideas.
Their job is basically to use visual elements in order to communicate ideas by using things like colours, images, charts & graphs.
- Where would you see this person’s work (e.g. in the newspaper, in a game shop)?
Graphic Designers work is something that is quite popular and can be found in :
Newspapers
Magazines
Internet
Logos
Business Cards
Billboards
Posters
Greeting Cards
Newspaper Layout
Logos
Most Graphic Designers take the support of InDesign, Photoshop & Adobe Illustrator in order to establish their work in these various forms.
- What training is needed for the career?
In order to become a succesful Graphic Designer many skills are required. These include :
Having excellent perceptive abilities and aesthetics
Graphic Designers need to be able to visualise their work well.
They also need a command of tools and materials, this also means that they need to be able use specific and a variety of techniques in their work.
Despite all this they need to be able to deliver their message they wish to convey quite effectively.
Not only this but they are also required to know various aspects of their industry such as letter form, typography, information design, publication, print design, computer graphics and advertising design.
- What kind of software and hardware is used?
Most graphic designers will use double monitors. Some will even use a graphic tablet, such as those by WACOM as they are extremely helpful in their work.
Some graphic designers even use a graphic monitor once again those made by WACOM in which you are allowed to directly draw on your monitor into the software with an electronic "ink pen".
A good graphics card is also necessary for larger projects.
However most Graphic Designers will just stick to using the programs Adobe Illustrator, InDesign and Photoshop. They will also need basic things like scanners & printers.
ANIMATOR
What does the person in the career do?
A cartoon animator creates animation for cartoons, aniamted feature films, advertising or video games as there are many different jobs for this profession.
An animation is created by animators through making multiple frames of movement which when combined together will create an illusion of movement also known as animation.
An animator for a web cartoon might be the only person working on that cartoon, while an animator for a big- studio feature might be on of dozens. What a cartoon animator does depends all on the job he or she has.
On the other a cartoon animator who is a lead animator is essentially the project manager for the animation process. This person supervises a team of animators and artists, and makes sure the project is on track and consistent. The lead animator is responsible for making sure the project follows the established storyboard, and might have some say in staging and acting. A large-scale animation project might have several animation units, each led by its own lead animator.
An animator has many roles which they can attain as a career. However the career they choose is what controls what they have to do. Above are just the basics of what animators are able to do.
- Where would you see this person’s work (e.g. in the newspaper, in a game shop)?
Their work is most popular on TV & Websites. Also with advertisers, web design firms, video game companies or even with animation firms.
What training is needed for the career?
In order to become an animator a lot of training is required in many areas for example as an animator you:
Are expected to know the BASICS
Individuals who are interesting in a career in this field will need a solid and extensive foundation in basic drawing skills, as well as colour design and computer applications. Having a knowledge of various programs like Adobe Photoshop is helpful as well!
Need to decide and specify education in the TYPE of field you wish to work in on animation.
Animation is no longer soley of cartoons. There are computer animators who use 3D images to create animation, as well as stop-motion animators who use clay or plastic models to create the illusion of movement. Training in either for film or computer generation is useful: training like this can be obtained in schools which are dedicated to animation and graphic design. Computer animation studies are also available in many colleges, as well as specialised technical schools such as Regent University's School of Arts, which offers an in-depth training program in all aspects of animation.
Internship training can usually be under taken at animation studios and while there is no pay involved and the experience gained can be useful later on in a career. In addition, learning to us such computer programs as Adobe Photoshop, Adobe Illustrator and 3D Studio Max will give a solid foundation for animation studies.
AS WELL AS KNOWLEDGE
In addition to basic animation knowledge animator should be able to draw both 2D and 3D animation, a solid background in 3D graphic design is very useful. In addition video and special effects are also relevant areas that should be examined.
In order to become a successful animator many skills and training is required as stated above.
- What kind of software and hardware is used?
Lightwave, Softimage, Cinema 4D, Inkscape, Flash & 3D Studio Max.


 Vector Based image extablished on inkscape.
 A Gif image.
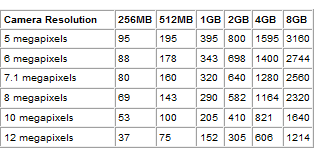
 JPEG image